With summer just around the corner, it is time to sew some cute shorts for the children in your life.This is a great project for beginners, and what better time to learn how to sew than while the kiddos are too young to notice any errors. Also, their seams are short, and sew up quickly.
Supplies:
1. A pattern for shorts the proper size for your child or children. Look for a pattern that has two or three pattern pieces and an elastic waist. The pieces should be the front, the back and possibly a pocket. The waist band will be created by folding the fabric to the inside and sewing around the top to create channel for the elastic. My favorite children's shorts pattern is Stretch & Sew 992.
http://www.stretch-and-sew.com/992.htm . This pattern includes long pants, a skirt and three shirts in sizes 21-32 inches. The shorts work well for boys and girls. Trace your pattern to preserve the multi-size choices.
2. Tracing paper if you plan to trace the pattern. I buy this by the roll at my favorite craft store, it comes in narrow, 12 inches by about 50 feet and much wider, 24 and 36" by about 50 feet. Toddler clothing fits well on the narrow paper. It is also something hand to have around that you can share with children so they can draw and trace pictures.
2. Cotton fabric, start with a dressmaker or quilter quality cotton fabric. As you become more experienced there are lots of choices, including bottom weights like trigger or denim. Most fabric stores have a novelty fabric section where there are fun prints for boys and girls. One yard can be enough to make two pair of shorts for young children. Or slightly more if they are a little older than toddlers. Pick a solid color or something with several colors so you can match it with several different colors of solid cotton T-shirts. You will appreciate the mix and match combinations you can get and it is easier for the child to pick out what they want to wear.
3. Elastic, enough to fit comfortably around the child's waist.
4. Thread, to match the fabric.
5. 2-4 inches of grosgrain ribbon (optional) This will not show, any color is ok, but probably match the fabric.
6. Pins or weights, pins if you are cutting with scissors, weights if you are cutting with a rotary cutter.
7. Cutting tool, scissors or rotary cutter. If you use a rotary cutter you will need a cutting mat. If you are a beginner you probably are not using rotary cutters. I will discuss some of the advantages of rotary cutters later.
8. Bodkin or larger safety pin to pull the elastic through the waist/elastic casing.
9. Sewing machine, and a serger is nice for finishing edges but not required.
Next:
Preshrink your fabric. To do this just zig-zag stitch the cut edges of your fabric and wash it in the washing machine. Wash and dry it just like you plan to wash and dry the finished garment.
Fold the fabric with the selvage edges together and align the pattern pieces on the grain of the fabric as indicated on the instruction sheet included in the pattern. When the pieces are properly aligned, pin them to the fabric. Cut the fabric pieces. If the pattern has pockets there are probably three total pattern pieces, if not then there are two pieces, the front and the back.
 |
| Pattern Pieces Laid out on Fabric. |
 |
| Pattern Pieces Cut Out. |
 |
| Pattern Markings that are Important. |
Your pattern will have markings that help with placement and sewing. The close up of this pattern piece shows a line with an arrow, a notch, and lengthen or shorten marks.
- The notches are so you can find proper placement when aligning pieces before sewing. The only notch in this pattern is at the hip, where the pocket and sides line up. Cut your fabric so that you know where your notches are. I have cut these notches to the outside which is traditional especially for a beginner, however, a simple 1/4 inch snip into the seam allowance area can be just as effective.
- The arrow line shows how to align your pattern with the straight of grain. Grain is the lengthwise threads that make up the fabric. The easiest way to make sure it is straight is to measure to the arrow line from the selvage (finished lengthwise edges on your fabric) from near the top of the pattern and near the bottom of the arrow. Both measurements should match. For example, if the measurement near the waist portion of the pattern is 7.5" from the edge, then the measurement at the bottom of the arrow should also be 7.5" from the edge. It does not matter what that measurement is, as long as it is the same for the top and bottom of the arrow line. Each pattern piece will have a different measurement from the edge because of how it is placed on the fabric.
- The parallel lines just below the waist are where you would either fold to shorten the pattern or cut and spread apart to lengthen if your child was either shorter or taller than the pattern was designed to fit. If you lengthen the pattern, it is best to cut another strip of your tracing paper to tape into the gap that will be created so that it is easier to keep the pieces straight and duplicate your results if you will be using the pattern again.
Sewing it all together:
Your pattern instruction sheet will have steps for sewing everything together. If you have pockets, the first steps will be how to finish the pockets. These can be in the seam or can be part of the waist assembly. If you do not have pockets then skip this step. Kiddos love pockets though so I usually chose to add pockets.
Before you sew it together, you may have to make a notation so you know which side of your fabric is the Right side or Wrong side. Solid colors are hard to tell. Sometimes fabric is folded right sides together on the bolt, other times the wrong sides are together. The dark blue fabric I used here is hard to tell, so when I took the pieces off of the pattern, I used pins to help me know which pieces were the fronts, backs and which sides were the right or wrong sides of the fabric. Pieces are sewn with the right sides together so you will need to be able to tell them apart. Brightly printed cottons may be easier to tell right and wrong sides.
I have found the easiest way is to place pins on the right side of the fabric. On the front sides, I place one pin on the right side of each front piece and on the back sides I place two pens on each side of the right side. This keeps me from mixing up the sides or the pieces if they become separated from the pattern pieces before I sew them. See photos below.
 |
| Right Side of Fabric, Front Pieces. Note only one pen in the corner of each piece. |
 |
| Right Side of Fabric, Back Pieces. Note two pens in each corner. |
Pockets:
Three are several types of pockets. Some are sewn onto the outside, some are in the seam and some are folded, like the ones on this pattern. For these pockets, place the right side of each pocket piece to the right side of the front pieces. The pockets line up on the straight side, which is the side seam area. Because this fabric is so dark, I am using little pieces of tracing tissue paper that you can see through to help illustrate where to place the pocket pieces.
 |
| Right sides of pockets, on right sides of front pieces, with paper tissue between the pieces. |
Sew each pocket piece to the shorts fronts, leaving 5/8" seam allowance along the curved edge. This will be the hardest seam you make on this pair of shorts, simply because it is in the middle of the fabric. If you can complete this seam the rest is much easier. Once these seams are completed, cut the corner piece away. See below.
 |
| Pockets placed with right sides together, and folded so you can see the front of shorts. |
 |
| Front of shorts piece cut away at pocket seam. |
For a smooth fold, clip the curved portion of the seams from the edge almost to the seam line.
 |
| Chalk marks indicating where the curves are on the pocket. |
 |
| Same pocket on left, with curved seam clipped. This has been stretched to lay flat along the seam so you can see the little clips. Right side not yet clipped. |
Fold pocket to the back, press. See below. Then repeat the process for the other side of the front.
 |
| Left front pocket being folded to the back. |
 |
| Press the pocket so the curved seam lays flat. Left Side, pocket sewn and pressed. Tissue on the left shows where the pocket is on the bottom of the front piece. |
Top stitch along the pressed edge of the pocket, then fold the pocket to align with the notches on the top of the front and on the sides. Sew the bottom of the pocket closed. See below. I folded the shorts front up and pinned so that it would not get caught in the seam.
Match the notches on the pocket to the notches on the front of the shorts. There is one at the top and one on the side. Pin and baste the pocket in place. Baste is to sew with large stitches to secure the pocket in place
 |
| Left side has been folded, tissue in pocket shows how the back of the pocket has replaced the corner we cut away. |
 |
| Front pieces with pockets basted in place. |
Sewing the pieces together:
1. Sew the two front pieces with right sides together creating the center front seam. This will be the curved side of the pieces.
 |
| Front pieces, with right sides together, ready to sew front center seam. Front center seam is marked with chalk . |
 |
| Front pieces, with pocket folded to the front, you can see the clipped curve at the pocket seam. |
 |
| Front and Back ready to sew together. |
2. Sew the two back pieces with right sides together creating the center back seam. Again, this will be the curved side of the seam. .
3. Place the front and back together with the right sides together. Sew the side seams. Sew the inside leg seam, matching the center front seams.
 |
| Front and back ready for side seams |
 |
| Ready for inseam, or inside leg seam. |
4. Optional. If desired you can zig-zag or serge the seams to finish the edge, you can also use pinking shears to finish the fabric edge. Zig-zag stitch around each leg and around the top of the shorts by the waist area.
5. Turn up about a half inch to one inch hem around each leg, press, turn under raw edge, sew.
 |
| Turn up leg hem, press. |
 |
| Fold in raw edge, sew hem. |
 |
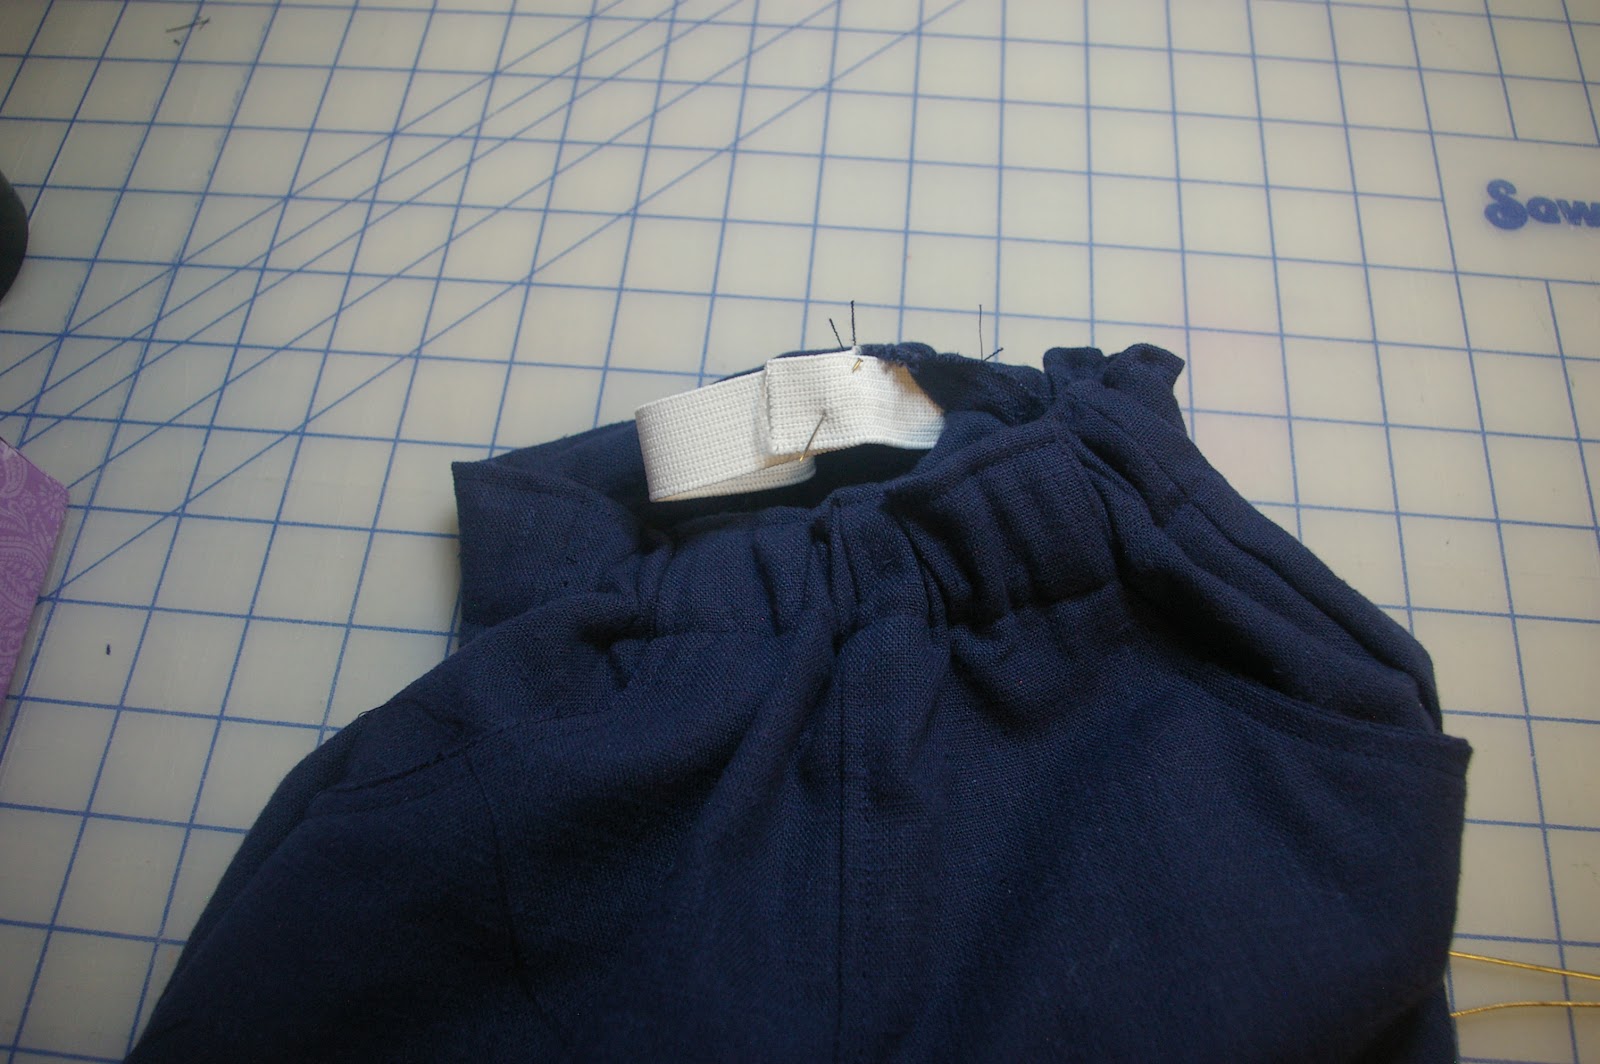
| Sew the elastic ends together. |
7. Before sewing the final two inches of the casing, fold the grosgrain ribbon into a loop and place at the center back seam with the edges under the fabric and the loop at the back seam. Sew the opening shut. This helps the child be able to know the front from the back.
 |
| Place the grosgrain tab, sew the final open casing area shut. |
8. Congratulate yourself for a successful garment!
Everything you learned here can be applied to long pants for kiddos, or even pajamas for kiddos or adults. To speed up the process, cut several pair at the same time using a rotary cutter and a cutting mat. The surface under the garment in these photos is a large cutting mat. It doubles as my work area and I can slide it behind a bookcase when I am not using it. If you sew a lot or quilt, or have any crafts where you make cuts it is a very handy tool.