10.18.2017

Lacy Shrug


I think this is the longest it has ever taken me to knit something, or maybe I should say this yarn knew what it wanted to be and everything I had planned for it was not it. I purchased the yarn for a loose fit summer cardigan but no matter what needle I used I could not make it produce the necessary gauge to fit the pattern. I finally gave up and got a different yarn to finish the original plan.  


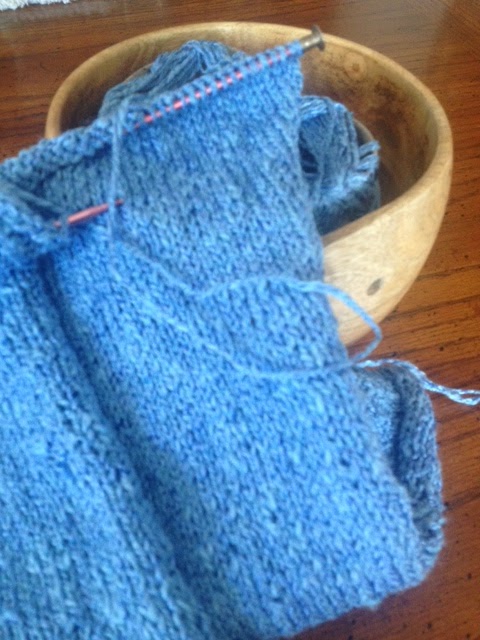
Then I decided I should use this yarn for something else. I started this pattern shown below.  I had made a mistake in the length of the project before adding the "sleeve" width section but decided it would be okay. It probably would have been, but there was that nagging thought in the back of my mind that perhaps I would be just a few inches short on yarn. Plus, I kept making silly errors in the knit pattern. I worked the project until it was about 20 inches long and set it aside while I decided if I was going to rip it back and make it the original planned length. Last blog post I had decided to frog the whole thing and start over.   


Once I made up my mind, the whole project was a race to the finish. It must have been what the yarn was meant to be because when I committed to starting a new project, it was finished within a month.  

Here is the next project.  It is going pretty fast too.


8.13.2017

Frogged

I started knitting a shrug in Tahki Cotton Classic over a  year ago. Then I made a mistake on it, actually, I made several mistakes on it and ripped it back several times to the errors, made the corrections and continued on. Truthfully, I had made an even bigger error on it somewhat near the beginning but decided I would just alter that into the pattern and match the front side. This error was at what length to start the sleeve. 


The project at about 12 cm

The sleeve was to start at 12 centimeters, but I started it at 12 inches. That is a full 19.5 cm, or 7 3/4 inch mistake(15 1/2 extra inches to knit for the whole garment). I told myself I could live with this alteration, but the longer it got the more it bothered me so I set the whole project aside and pondered the decision for a long time before I ripped it back to the beginning of the error, 12 cm from the start. After such a long time since starting the project, of course, I made a mistake in it right after increasing at the correct place for the sleeve. So I ripped it back again and made yet another mistake.  

Today, I ripped the rest of it back and decided I would try it over again with different needles. The original pattern was an open diamond lace, the yarn is meant for a size 6 US needle and I was using an 8 US to get the gauge. The result was a very soft lacy loose knit pattern and it looked nice on the needle. The smaller needle will make the yarn behave better and be a little firmer knit, but I will have to make more stitches to get the same size.  

Now I have to decide if I am going to use the same open diamond pattern or maybe pick something else. The texture will be different because of the smaller needle size but I think it will be easier to read the knit and not make the same mistakes I kept making earlier. Thankfully, it is a shrug, fit is not tight or exact and I will be altering it to fit the measurements, not the stitch count. I am sure I will be happier with the results but I am making something with bulkier yarn for the next project so it goes much faster than this re-knit is going to be.  

6.25.2017

Ah Summer


Container Gardening in a Small Space

Petunias


In the winter my balcony patio is bathed in sunlight that spills into the living room and gives the benefit of passive solar heat. I appreciate the help from the sun and it is noticeably colder on cloudy days. It makes me think what a great place to grow some things in the summer. But in the summer it is a shady patio which makes it a wonderful place to be outside without being sunburned. 

Last year I planted cucumbers, bell peppers, tomatoes, basil, rosemary, and cantaloupe. The cucumbers grew up the railing and created a pleasant shade, pretty yellow flowers and maybe two cucumbers. A spider claimed the basil and it was too cool for the tomatoes to produce more than a handful of very small fruits. The cantaloupe grew but no fruit. Lesson learned. This year the plan was for maybe a tomato, and more flowers. I picked larkspurs because they grow tall and would have enough sun to create shade and privacy and produce pretty flowers, coleus because they would do well in the shadow of the larkspur and have beautiful multicolored foliage and birdhouse gourds because they could cover the railing and maybe produce some gourds I could decorate in a couple of years after they dry out. 

House plant, with coleus, two ivy plants, and the cat's favorite, a spiky plant.


For mother's day, my daughter got me a decorative pot and my son got me a hanging basket of petunias which we picked because of the color, vibrant purple with white spots. The petunia plant is quite large, especially for the small space, but we could not get that lovely variety in a smaller version. I planted a tall spiky plant, a couple of decorative ivy plants and several of the coleus in the decorative pot. It will be very pretty when the coleus plants grow bigger, and if the cat will stop trying to ruin the spiky plant. These both go very well with the flower plan. 

Purple petunias with white spots, 
Then a co-worker gave my son some acorn squash seeds that do well in container gardening. Only 10 seeds. I figured if I planted them maybe three of four would sprout, but they all sprouted. I transplanted some of them which are not doing quite as well as the direct planted ones but all of them grew. Every single seed, I should be so lucky to have that much success from seeds. I also planted two small watermelons, some peppers which I will be moving into larger pots soon. Even though I only planted 5 birdhouse gourd seeds, all of them sprouted too. Because space is limited I will have to string climbing twine and creating hammocks for the acorn squash, mini watermelons, and birdhouse gourds. In addition, I have two tomatoes that are loaded with blooms so maybe we will have tomatoes before too long.    

Acorn Squash

Tomatoes and birdhouse gourds

Yellow and Red Bell Pepper Plants

Larkspur and coleus


6.11.2017

Orchids 2017

This is the last bloom on my orchid for spring 2017. In its wilted state, it is a pretty sorry sight.
The last orchid bloom of spring 2017
It makes me a little sad when the blooms fall away because they are so lovely and delicate and I know it will be a while before the plant produces another set of blooms.
Spring 2017 orchid at peak
 The blooms this year were extra special. Dot, the resident kitty, decided to walk on the orchid shelf and managed to knock the orchid pots to the floor last fall after blooming season. There was damage to both plants and I was not sure they would recover enough to bloom. One did not bloom, but I am hopeful it will bloom again in the future.

Close up of first bloom of the season
The plant that did bloom, bloomed in late February and has lasted until now, which is about two months longer than usual. I expect the last boom to fall off any moment. They are like tree leaves, once the blooms start to fall they all drop. Sometimes I have kept the blooms. They will dry and look nice in a flat dish, last season I put them on top of the potting mixture in the plant. Maybe that was a good thing because the plant that made the beautiful flower stem with the blooms also created a Keikis on the other flower stem.     
Spring 2017 Keikis
Keikis, Hawaiian for baby, usually do not bloom for about two years. Friends tell me I am really good with orchids, however, I am sure it has less to do with me and more to do with the environment. Orchids like bright, indirect light, in a warm humid environment. I live in an arid dry environment, but I have a south facing room that heats up nicely, especially in the winter. I keep the orchids where they get bright natural light but no direct sunlight.  

When they outgrew their original pots I moved them from the potting bark mixture to bare roots in glass vases. I set up a watering schedule reminder on my calendar and soak the roots for 30 minutes once each week. Because they are in vases, if it gets extra hot, I will splash about a tablespoon of water over the roots and into the vase during the week. This water will evaporate around the plant creating a slightly more humid mini environment for them. I think they are happy in this environment because they reward me with blooms and new plants and that makes me happy.  

5.14.2017

Just a quick catch up post


1st Orchid bloom of 2017

First, one of my orchids has bloomed again. I was a little worried as the cat had knocked them down and damaged their leaves last fall. I think this one bloomed in February, near the one year anniversary of my Father's passing. This orchid usually blooms twice a year for me, once at the end of the summer and once early in the year. This one has a stem of about 6 blossoms and they all still look almost as good as the day they bloomed. The blooms usually last about two months so we may be nearing the end of this batch of blooms. I don't have a green thumb. I am just lucky to have a room with the right light and humidity that the orchids love. My other orchid is struggling as it took a little more damage. I am hoping with a little tender loving care it will be better soon and maybe bloom next blooming cycle. I am planning a series of small  "picture" quilts and this is one of the subjects I am considering. 

Dresden Doll blocks before sashing.
with sashing

Second, While looking for a specific fabric I found the pieces to this quilt that I started in the 80s. I had taken a class with a co-worker who wanted to attend a learn to quilt class. I cut out and pieced these Dresden dolls but left the project unfinished when I realized I really did not like doing applique. Then I saw a quilting you-tube video where the quilter said a finished quilt was better than a perfect quilt so I used the blanket stitch to applique the dolls. Now I just need to add a border then get it quilted. I may even do more applique with the blanket stitch in the future. 

Log Cabin Heart Blocks

The bottom block is sewn with a better quarter inch quilt piecing presser foot.

Third, I am working on this log cabin heart quilt. I was having quite a bit of trouble with it until I started using a different quilt machine that has a proper quarter inch piecing presser foot. Notice the difference in the top and bottom pieces. The bottom one is going to square up much easier than the first few, like the top one. I wanted to have this one finished in February, but it took me a while to figure out how to easily make this log cabin heart quilt block. Believe me, this one has a few tricks and will probably get a full post later. It is not a quilt in a day quilt for me. It will be an ongoing project where I only sew a block or two in between other projects. 


Fourth, working on this wild and crazy kitty cat quilt. This one is going to look like an explosion at a crayon factory. My local craft scraps store had this little fat quarter bundle of kitty fabrics and the stripped fabric. I added the bright solids this one will probably need a pair of sunglasses for viewing. 

There has been at least one quilt project each month, and I am working on some options to be able to quilt these myself. I will have several to quilt so I am hoping that will happen soon I am looking forward to having several quilts completely finished. 

And just a couple of simple projects that brightened up the sewing room:  

Mug Rugs. Fun, small, and easy to quilt on a regular machine. Subject matter, color, size are limited only by your imagination. They are wonderful to have available for gifts. They are useful and fairly quick. I have been practicing my binding skills on them. Here are some I made in February. 


And yo-yo covered metal washers for pattern weights these really bring some color to dull muslin pattern tests. It also speeds up the time it takes to get to sewing instead of pinning and cutting out patterns with scissors because you can use the rotary cutters. 


1.23.2017

Starting a new quilt

Anita's Arrowhead Quilt Block


Instructions here

I love quilts, especially ones that are not just a simple four or nine patch or some variation of same. I usually pick complicated patterns that require a lot of cutting and piecing. It is after all a quilt and should require some effort, right? Or at least that is what I thought.  

A friend posted the photo above with the links back to the maker and the designer's instructions. It looks a lot harder than it is. It was designed by Anita Grossman Solomon who has written quilting books and offers classes on Craftsy.  

The maker, Karen Martin, said in Quilting Digest's article she had used her least favorite layer cake cuts which she had rejected from other projects. Loving scrappy quilts, this was just the inspiration I needed. I sorted through all of my fat quarters, and loose scraps from my own and inherited projects. Without regard to any color theme I just matched two colors per block for the most interesting contrast and started cutting squares.  

I had everything cut out in just a short time, and have all but about six of the blocks completed. I suspect block placement may be harder than anything else on this quilt. If  you like easy to construct quilt blocks then you have to give this one a try.  You will be doing a lot of pressing, so keep the iron hot. 

Some of my higher contrast blocks.


I am not receiving any compensation for telling you about this block, but I have included the links back to the article in Quilter's Digest, to Anita's Grossman Solomon's class on Craftsy and her pdf instructions. If all quilts were this easy I would have a lot more quilts. 

1.05.2017

Sharp Scissors

My mother sewed. She sewed a lot. The month before school started she would sew all our school cloths on her little black singer sewing machine. She had six kiddos and sewed for every one of us, including herself, dad and our dolls. When I was a senior in high school a friend told me she and our friends had been envious of my cloths and my Barbie doll's cloths too. That is not really too surprising though because mom was quite the perfectionist and everything we wore was an original. 

Mom laid down the law when it came to her tools though. We were not to touch her dressmaker scissors. When I started sewing she insisted that I purchase the best pair of scissors I could afford. I still have them and they hold on to a sharp edge for a long time. I had not used them in some time and pulled them out to use today. I do not remember when I last had them sharpened, but they are much sharper than my less expensive scissors that I use as decoys. 

Dressmaker scissors are flat, with the handles off to an angle. This keeps your fabric as flat as possible so you get an accurate cut. Precision matters when it comes to fit. Sharp matters too, as it makes the job easier.  


Here are my favorite dressmaker scissors

  • Top left - the decoy pair. I got these from a SewFro or Clothworld promotion. They are very inexpensive but do a good job if they are sharp. I use them more to cut the pattern tissue than actual fabric cutting. If someone finds them I am not going to worry about it. 
  • The orange handle ones on the top right are Fiskars. They are relatively inexpensive but are easy to resharpen with the Fiskars sharpening tool. I do not want someone to use these for anything else, but I can resharpen if they do. 
  • The ones on the bottom left are the Farr scissors I purchased when I started sewing. I will not mention exactly how long that has been, but I think the company that made them has gone out of business.
  • The last pair is a set of Gingher scissors. 

I have the Farr and the Gingher sets professionally sharpened when needed and without a doubt, they will outlast me. 


1.01.2017

Welcome to 2017

Time to welcome the new year, change a few habits and move on with goals. I have decided to make it up as I go along this year. Yes there are goals, but I am not going to let them get in the way of anything. Since they are goals, I will be free to add more as the old ones are accomplished and new ones are presented. May we all accomplish more than we have planned. 


Almond Crescent Cookies
While I am still thinking about it let's talk about holiday baking. Just before the holiday week I told my son I would be making "Christmas cookies" today. In my mind, that means I will be baking all of my favorite cookies. He immediately ask if I was going to make Almond Crescents which were a favorite his grandmother made every year. Almond Crescents melt in your mouth and taste like they were created by the Angels and blessed by God. Even though they are that good, I do not like to make them and they were not on my cookie goal list. 

Most cookies have a moist batter because you start with butter, sugar and eggs. From there you add wet flavorings like vanilla, then spices, baking soda, baking powder, flour and sometimes chips and/or nuts. Almond crescents do not have eggs, or baking soda, Instead they have ground almonds, so starting right there the "dough" is much dryer and takes on the texture of sand. Something about this texture is displeasing to me and I think I tossed out the recipe last time I made them. I had to hunt all over the place to find it. In fact I did not find my copy and finally located one on line. You can find Almond Crescent Cookies here. They turned out to be easier than I remember, but maybe it is because going into it I knew I would be working with a dry sandy dough instead of more traditional dough. I doubt that I will incorporate them into cookies that I make for anything other than very special occasions though. 


Almond Crescent Cookie Dough
Quote for today:

Barbara Johnson -  “A balanced diet is a cookie in each hand.”