12.28.2016

Goals or Resolutions? It's that time of year again.  


I don't like resolutions. Goals however are required. I like goals better as goals don't need to be made at the first of the year, since a new goal can be added as soon as the need, plan, or desire is recognized. Each hour, day, month, season, year, decade can have new goals, and somehow it seems more positive than a resolution.    

I just found this blog today by Judith Francois at The Quiet Girl Diaries. Judith has listed her goals and included a free goal setting worksheet. Since one of her goals is to grow her blog I am pretty sure she will not mind If I share this link so you can pop over there read and subscribe. Don't wait too long though. One of her goals is a blog update and name change.

I hope you accomplish all of your meaningful goals in the new year.


Inspirational Quote for the Day

C.S. Lewis -   "You are never too old to set another goal or dream a new dream."


12.21.2016


Just stopping by


Winter is here, officially, although it seems to have arrived a few days early with snow and bad weather. Today it is much warmer than predicted and I am just stopping by to see if my own blog is even still here.  How pathetic is that? 

Google has changed a few things so I also looked in on the bloggers I once read as soon as they posted anything new.  It seems that I am not the only one not posting very frequently any more either.  Many of those I followed do not have a valid site any more and others post even less frequently than I have.  I will make it my plan to find more to blog about in the new year.  In the mean time, Happy Winter to those of you in the northern hemisphere.  Enjoy your summer to those of you in the southern hemisphere.  

I am busy baking this week, have been busy knitting most of the fall and plan to sew a little more next year.  This afternoon the kitty, Dot, has a follow up with the vet. She has been in a cone most of the autumn because of an injury and subsequent surgeries.  She is finally almost healed but I don't think she will be out of the cone yet because as it heals it is super itchy and she will not hesitate to re-injure it by scratching.  She even seems to understand that the cone is for her own good.   

Dot in soft cone after 2nd surgery, looking sad.
     
Annoyed Dot with hard cone and drains in her ear.  Third time is a charm?


10.02.2016

First Fall Project - Toe up socks

Trying different techniques

New Socks, Toe-up, Magic Cast-on, and Magic Loop vrs Double Points
Knitting socks, a new way.  I keep finding toe up sock patterns on Pinterest so thought I would give it a try. 

Most of us who knit have learned to knit socks from the cuff to the toe, also known as top down. There is always the possibility that you could run out of yarn before you finish a pair, but more importantly, when you reach the toe you have to seam the toe closed.  Toe up socks with the magic cast-on create an invisible start to the sock and eliminate the toe seam.  This is a great time saver and is much easier than a Kitchener stitch. Plus it looks very nice:

Toes of a new knit with magic cast on, the cast on row is exactly like the other rows.

The magic cast on eliminates the need to stich the toe shut and lets you start the sock at the toe, knitting to the cuff.  I am always for anything that makes finishing knitted projects easier.    

I also made one sock with double point needles and the other with a long circular needle using the magic loop.  I was very pleased with the sock on the magic loop needle.  Change area between front and back and along the gussets just looked neater.  There was also very little danger of dropping stitches off the end of the needle.

Magic loop/circular needle on the left, double points on the right.

Circular needle with loops pulled. 
If the loops get in your way give the needle a twist and the loops will change to be out of your way.

I did not want pointed toes on my socks so I made a wider toe area.  Once I am sure I have the sizes exactly right I will make these again  and create a decorative stitch pattern.


7.04.2016

Summer Knits

Warm Weather Knitting


I found this pattern in VOGUEknitting Spring/Summer 2008.  I was busy at the time so I purchased the magazine and kept it until I had time to make it.  Probably a couple of years later I purchased cotton yarn for this project.  I worked on the gauge swatches for quite a while but I was unable to obtain the proper gauge with the yarn and needles, or any other needles for that matter. 

I set the project aside, realizing that now I had to purchase a different yarn if I wanted to get this to work. Good news.  We had a cool spring this year and I had some unexpected free time so I am happy to say I have finally finished this project. 

Here is a copy of the project on the VOGUEknitting cover.


I did put a thin one row border on the front so that it had a sturdier feel under the buttons, everything else is just as listed on the pattern. 

Here is a look at what I am doing with the thinner yarn that could not match the gauge


Hoping for a cooler summer so I can finish this project too.

4.17.2016

Cat-Trap Scrap Project

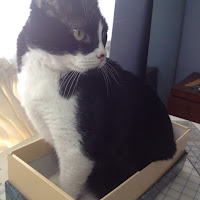
This is Dot. She likes to be in the middle of any project that gets to the cut table. 

Dot in a Cat-Trap
This week she discovered foam. She has always loved fleece, but this new thing, foam, is even better. It is soft and she can tear it up with her claws. She is sure it is a special present just for her, but alas, it is not. 

When I finished my original planned project there were scraps. So I made a fun little project that was special for Dot. A pad for the bottom of the shoe box I use as a "cat-trap" so she can be nearby but safely out of the way. The pad could just as easily be a little project for a Barbie doll bed. In that case you might place the little cushion on top of the box and use the box to store doll clothes. The hardest thing on this project is the math and this is very simple math so this is a very simply project. 

Scrap Project


1.  Measure the inside dimensions of the box. This box is 12 3/4" by 6 1/2".  Use this measurement to cut one piece of foam.  


2.  Add the thickness of the foam plus 1" for the seams to the width and length measurements of the box you are using. The foam I used was half an inch thick. (I did not add this width on my fabric cuts because it was so thin, but if I do this again I will.)  This is the measurement for fabric cuts.   

     Length: 12 3/4" (Box length) + 1/2"(Foam thickness) + 1" (Seams) = 14 1/4" 
     Width:     6 1/2" (Box width) + 1/2"(Foam thickness) + 1" (Seams) =  8"
      
     Box you use: Length ________        Width _______  = Foam Cut Measurements _______

     Length you listed above_______ plus Foam Thickness:__________ plus 1"=_________
     Width you listed above  _______ plus Foam Thickness:__________ plus 1"=_________


3.  Cut 2 pieces of fabric for the measurements you made above. 


4.  Sew the two pieces of fabric with right sides together along the long edges. 


5.  Press seams open.  I used foam scraps like a pressing ham to keep from pressing an unwanted crease into the fabric.  


6.  Turn right sides out.


7.  Fold the foam in half lengthwise and insert into the tube you have created.  Center and unfold foam, working the foam into the seams and centered in the tube.  


8.  Hand stitch the ends closed.


9.  Place pad into Cat Trap if using to keep kitty companion safely out of the way, or place on top of the box if using as a Barbie doll bed mattress.   

Dot checking out new padding in Cat-Trap