

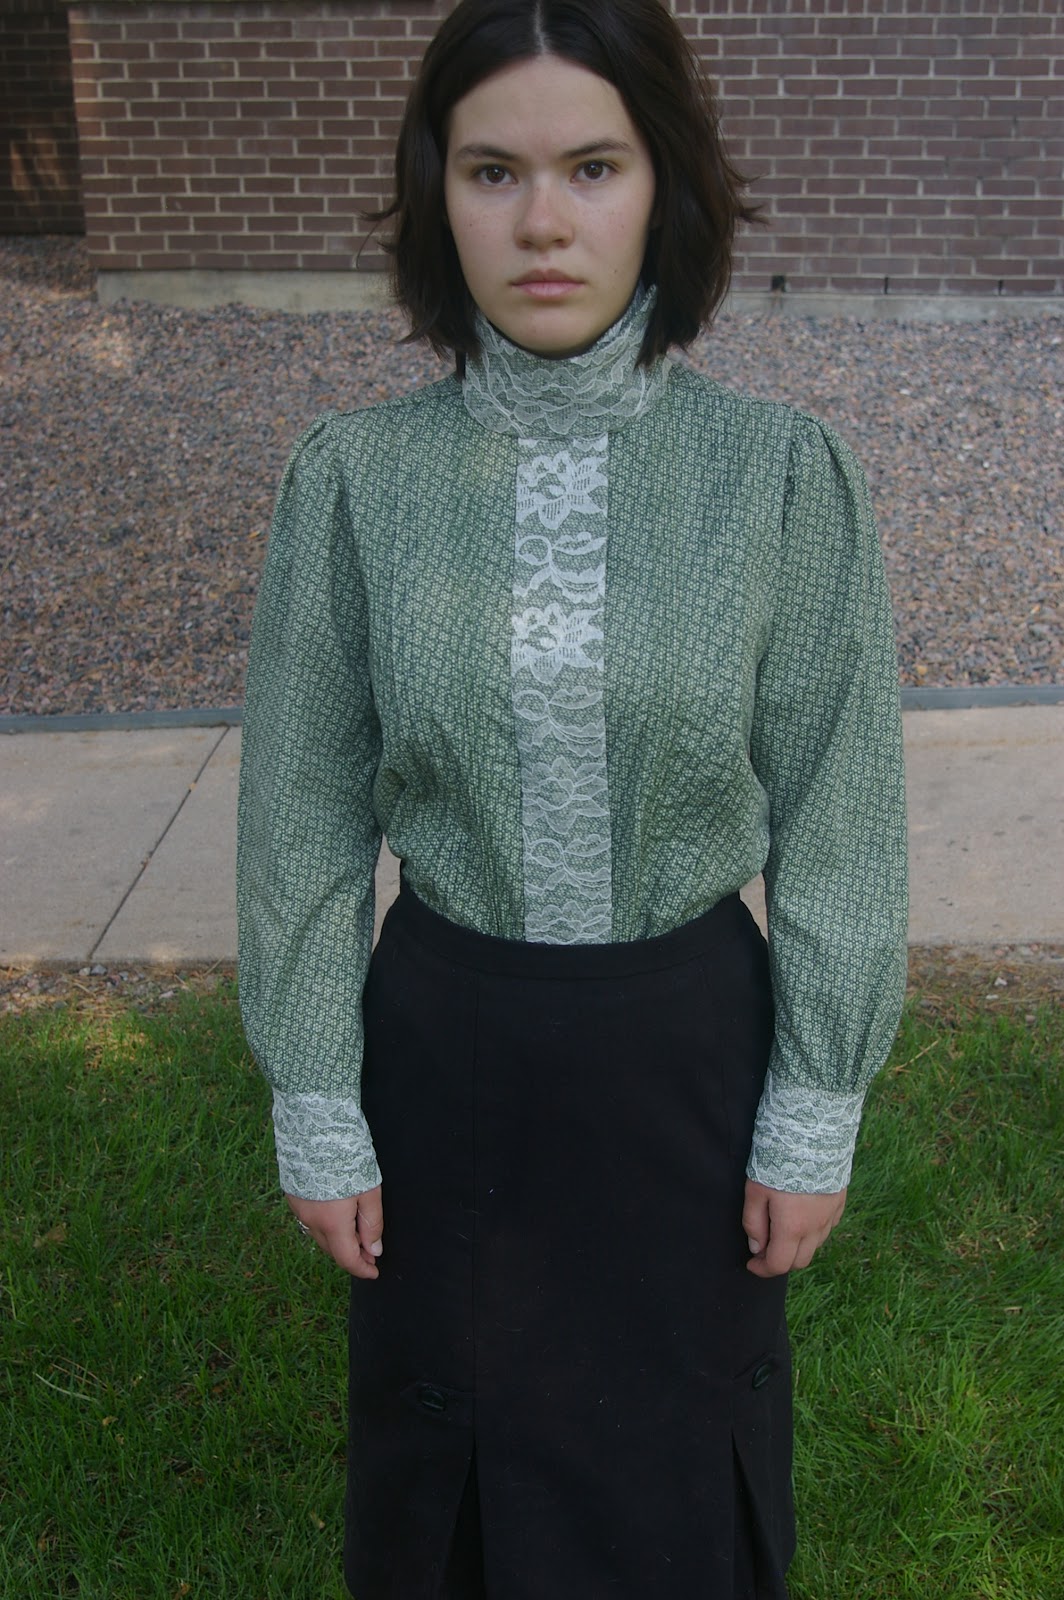
Except for sewing on snaps I have finished the #0335 Ladies Blouse from March 31, 1912. The pattern only includes 5 pieces which are the collar, blouse front, blouse back, and sleeve in two parts. In addition to these piece you will need to create your cuff and lace pieces from dimensions included on the instruction pages. I had completed the tucks on the fronts and back, learned how to make a lapped seam, completed the sleeves, including the lace trimmed cuffs and was ready to sew everything together. I thought it would be pretty straight forward except for the collar, which I could see would not produce the same results as the illustration.
At that time I told you I thought it was not a hard pattern, and up to that point I would say that is the truth. As I started sewing the pieces together I found out pretty early on that it was going to be much harder than I had anticipated. Most of the difficulties are because of errors on the pattern.
Special Techniques - in order of use on the pattern
Tucks and Pin TucksPin tucks are very small tucks made today with a cord sewn under the fabric with a double needle. I think when I make this this again I will opt to just press the pin tuck fold and sew a very narrow tuck seam, much like I did on the regular sized tucks. I found it easiest to mark the tuck fold, pres that line, then sew along the fold by amount of the tuck; this will be half the full width as measured on the pattern. I used a presser foot that was the exact width I needed to take up. This made it pretty easy to sew a straight line on the larger tucks. You probably already have presser feet that will help you keep your seam aligned.
 |
| Tailor Tacks and Chalk Marks for Tucks and Pintucks |
 |
| Large Tucks and Pin Tucks and Chalk Mark for More Pin Tucks |
 |
| Double Needle, Pin Tuck Foot and Special Pin Tuck Plate with Cord |
 |
| Center Pin Tuck Chalk Mark, with Pin Tuck Foot and Double Needles |
Gathering thread
A gathering thread is usually a double row of large basting stitches. To pull up the gathers the bobbin threads are tugged to force the fabric into a gather. The double row keeps it from coming undone. My machine has a long basting stitch which will tack a knot at the start. I used this single line stitch for the gather across the mid back and the double row of large basting stitches for the sleeve cap.
Reinforcement seam
This is the little v-shaped line of stitches to reinforce the area for the cuff vents, just shorten your stitch length sew along each side of where the slash will be, starting at the bottom of the cuff. Sew to the point the slash will end, then pivot with the needle down and sew back down the other side of where the slash will be. Once the reinforcement stitches have been sewn the slash can be cut. Cut the slash just before the bias binding is attached.
 |
| Back side of fabric you can faintly see the reinforcement seam |
 |
| Sleeve Vent Slash with Reinforcement Seam |
The bias binding is a narrow one inch wide bias strip, cut from the blouse fabric. It needs to be twice the length of the slash at a minimum and a couple of inches longer will make it easier to handle. Press the bias strips in half length wise, then press the edges to the center. With wrong side of blouse fabric facing up and wrong side of bias strip facing up and open, sew along one of the pressed folds from the bottom of the sleeve to the slash stopping point. Pivot with the needle down, then sew from the end of the slash point down the other side of the slash to the end bottom of the sleeve. Now with the right side of the fabric up, fold the bias tape with all edges to the inside center and top stitch along the slash, it helps to open the slash to form a straight line. Trim the bias binding edges to be flush with the bottom of the sleeve.
 |
| Pressed Bias Binding, Top and Bias Binding Before Press, Bottom |
 |
| Bias Binding Pinned |
 |
| Bias Binding Attached |
 |
| Bias Binding Ready for Top Stitch |
 |
| Bias binding Fully Attached |
 |
| Bias Binding, Trimmed Flush |
A tailored lap is another style of sleeve vent treatment that is easier to find on men's sleeves. There is a specific shape to cut and sew to the vent. The result is a much larger opening at the cuff. It is easier to roll up a sleeve with this treatment. There are several steps and the July issue of threads has a good article on this, or an internet search will probably turn up instructions. I did not use this method but can find some more instructions if anyone is interested.
Lapped seam
A lapped seam is made with both right sides up and placed specifically as the pattern requests. Sew on a marked seam line. You can mark the line with tailor tacks or tailor's chalk, a disappearing ink marker or even a basted line. Once you have stitched this first line you may need to grade the seam. (trim to a specific size) or the placement may have taken this into account and may not be necessary. I found this next part of this step easiest to do at the ironing board. Press the seam, then fold the right side over the seam so that both right sides of the fabric are touching and now all of the garment is left side of the first seam. A quick press along the original seam at this point is recommended. Turn the whole folded garment over, like closing a cover of a book, and fold fabric side that was on the bottom, but is now on the top, to the right, like you are opening the cover on a book. Both right sides are up now, press the seam at the fold, pin to keep secure and sew down each folded side of the seam. All of your unfinished edges should be encased in this seam. Nothing is exposed to ravel and it is a very strong seam.
 |
| Lapped Seam Finished on Sleeve - threads indicate where to look |
 |
| Sample for learning how, mark seam lines |
 |
| Lap seam lines one above the other |
 |
| Orange stitches over marked seam line for first seam. From this step lap right over to left and left under to right side, the whole piece will be upside down, turn right side up and stitch along each folded edge, see below. |
 |
| Finished lapped seam. the original orange seam thread can be seen near the top |
With the blouse still wrong side out, and the sleeves right side out, pull up the gathering stitches on the cap of the sleeve to fit the arm hole opening and sew the sleeve into the armhole opening. Make sure you match the proper sleeve to the correct left/right sides. The lapped seams at the top of the front and back of the garment will match to the lapped seam on the sleeve. The under arm sleeve has a mark to match it to, it does not line up the side seam of the garment where the front meets the back.
 |
| Sleeve, sewn in |
I honestly could not find anything to let me know what this meant and it is optional so I did not do it. I thought it might be have meant to add something like a lace inset, but if so I think it would have said lace inset. It does mention narrow ribbon or pipping, but I did not do that either, on a more fancy fabric than I used this might be a very nice touch.
Placket for button and button holes
This is their very abbreviated instruction for adding button and button holes. It is also not mentioned that button holes should be worked on the right and buttons sewn on the left since it is a woman's blouse. I am not certain when button holes on the right for women and left for men became the standard, and a quick internet search did not shed any light on this either. It makes me think that it was not standardized at the time this pattern was originally produced. This pattern is designed to have a self facing placket that would fold back about an inch on each side. Also, I would not sew on a button hole or button without some type of interfacing as the fabric might be unstable and tear or pull. My plan was to add a muslin strip on the self facing portions, finish the edge, turn, press, tack then make the button holes. Watch for more instructions regarding this placket when I cover pattern difficulties.
Thread loops
A loop made from a chained (as in crocheted or tatted) thread to fasten over the button. On a fancier garment this might also be a piece of small decorative cord, sewn on to fasten the buttons. I opted for snaps so I did not make any thread loops. Today, these could still be sewn from a decorative cord, or even chained from a sergered thread.

Tricky Areas and Problem Spots in order of realization
SizeTo make this fit me, I will need to enlarge the pattern by so much that I do not want to mention it here. Plus I don't have anyone to help with exact measurements so, I opted to make this fit my daughter. Her measurements are within an inch of the pattern size. A simple 1/8th of an inch increase at each seam point will correct this very easily. I added 1/8th inch to each side of the front, and the outer edges of the back. At the center back, I pulled the pattern 1/8th inch off of the fold, this added a 1/4 inch to the width of the back.
So good so far, but these changes mean that there are two more places I will need to alter. The sleeve width has to be corrected at the underarm seam, I opted not to alter the lapped seam on the outside of the sleeve because the sleeve cap gathers would hide an alteration this small. And I was not adding any thing at the shoulder seam.
The collar also has to be corrected because of the extra width at the center back and at the front. I pulled the collar fold off of the fold by a 1/4 inch, this added a half inch to the back of the collar and I added a half inch to the front of the collar. The collar was going to have it's own needed alterations beyond this, but for size, this was a start.
Collar
When laying out the pattern pieces I could see that the collar as designed and placed by the pattern was not going to result in the collar that is included on the illustration. I opted to completely redesign the pattern collar to fit the illustration as best I could. Because I opted to have the buttons be on the left and the button holes to be on the right, I knew that I would need the collar to lap over the front and fasten on the left side. To make this work with the right straight of grain I marked my pattern at the side seams and cut a new front collar on the fold to sew on the right side at the side seam and over lap across the front to the left side seam. I also allowed extra for the front size alteration. Because I knew to anticipate this problem, I did not cut the font collar section until just before I was ready to sew and attach the collar. I wanted to be sure any unanticipated fitting problems were known before I cut this last piece.
Cuffs
The instructions indicate that the lace is attached to the wrong side of the cuff, then turned right side out. I opted instead to have two sides of the fabric and use the lace as an overlay on one side. I decided this would work better for the collar too. It is just a more finished look, and the wrong side of my fabric is not as dark as the right side.
Sewing fronts to back
Here is the first problem I encountered that I did not see coming, although, had I paid a little more attention when I was laying out the pattern I would have seen it. Sewing the tucks down the front of the blouse takes up some of the fabric. The width of the front shoulder seam is now much shorter than the width of the back seam. My first thought was that I had made my tucks too big. So I pulled out the original pattern print out and carefully folded the larger tucks and compared the results to the pattern for the back of the blouse.
 |
| Did I make the tucks too large? |
 |
| No, It matches the pattern |
No, that was not it, the original pattern pieces now have the same problem I have with the shoulder seams. Was the extra width on the back for a dart? Should there have been more tucks on the back too? My first thought was to gather in the difference, but then I couldn't make a proper lapped seam so I took out the gathers. Then I tucked it in three places thinking that might work. When my daughter got home I draped the front and back shell to see how that had effected the fit. I found that it really needed to be near the width of the original cut for the back so I took out the tucks and sewed the front to the back, matching the outer width on each side, this left a big difference at the collar attachment area that I knew would be a problem until the very last step.
Neck and front facing fit
After draping the blouse, without the collar attached, I marked the center fronts. I discovered that the front was not going to fit as expected. There was not enough fabric on the fronts for the planned fold-over plackets for the buttons and button holes. I cut two strips for front facings, created a muslin sew-in interfacing and attached these two strips in a seam down the front edges. Now I had enough to face the fronts and move the center fronts for better fit. I draped the blouse again, marked the placement for the front lace panel, and the new front overlapping collar section. I sewed the button holes on the right side and attached the buttons on the left side.
 |
| New front facing with muslin interfacing |
 |
| Trimmed extra wide back of shoulder seam, where pins are |
 |
| Marking where to add the collar front |
 |
| Inside of collar front and overlap treatment |
 |
| Where the overlap fastens |
After having this much trouble at the neck with fit I would not recommend this for a beginner. It takes a little bit of extra time for the tucks and lace trim, but the problems with the fit at the neck are for someone with at least intermediate to advanced skill and experience. It is an attractive blouse. By modern standards there is a lot of fullness in the front and there could be some extra length in the back. I would recommend corrections to the back shoulder width and probably trim down the neck opening in the back by another half inch. This fit problem would have showed up in a muslin test, however, because I had run low on muslin I made the blouse from a piece of fabric that had fallen off into the stash box and did not seem to have any near term chance of for redemption.
The fabric is spot on I think. The lace shows up very nicely. You have done a lovely job on the blouse. I am glad your daughter was such a wonderful model. Thank you for all of the great photo's and tutorials. Amy
ReplyDeleteLorinda, I wish I read all this BEFORE I started my blouse... Although, I'm still unclear as to what you did with the tucks? I did the same thing as you, cut out my pieces, did my tucks, then found the back and front will never meet. Should I have pre-tucked my work, THEN cut out the front piece? Thanks in advance for any info. Dee
ReplyDeleteARgh - Blogspot isn't letting me post this with my WordPress account, I guess I'm anonymous...
Hi Dee,
DeleteI cut my blouse before I made the tucks. I like the idea of making the tucks first, but I was not sure how much fabric I would need and I think sometimes when you tuck first you waste some fabric. If I knew I had enough fabric, I would sew the tucks first, easier to keep even and straight. If you sewed the tucks, then cut the top without the tucks the shoulders would match, but you would still have fitting problems. The front would be even larger, and the neck might need alterations anyway. Also, your shoulder seams might be too wide then.
Draping a muslin is probably your best friend. When I did sew the shoulders, the back was plain, just as it was cut, the center back tucks were complete and the tucks in front were finished. This narrow front shoulder width turned out to be right. I placed the outside(arm side) of the front and back together, this left the extra on the back shoulder on the neck side. It is the photo with the picture of a couple of pens to show where I cut off the odd little triangular bits near the neck side of the shoulder. I actually needed to cut into the neck at the back, about 3/8" of an inch too to make the fit lay neatly at the neck. Be sure to drape on you or your dress maker form. Everyone is a little different and it may fit you a little differently.
One last comment about the tucks. Even though I am pretty experienced with sewing I did find it hard to be "perfect" with the tuck placement, so I just made sure they were the same on each side. I figured symmetrical was better than perfection.
I can't wait to see your finished blouse. This one was tricky. I would say the biggest challenges were all at the neck with the collar that has to be completely redesigned to match the illustration and the neck opening. I just worked through each little bit one step at a time. I knew the collar was going to be different, but I did not expect the neck and front opening to require the changes I made. As I ran into snags, I just worked on that one step until I had a workable solution before moving on. I treated each part like it was the only thing I needed to do, so I would not rush ahead without a satisfactory result. I think for me sometimes having to wait until my daughter was available was the hardest part, but having to wait gave me time to think out solutions. She has a dress form, but it is not perfect, there are some things that don't adjust on it like neck size and bust height.
Thanks for the comments on my Blog. Good Luck!
Ahh.... the lightbulb just went on... Crazy day today, I think I should start again tomorrow. Your blog is wonderful btw, Dee
ReplyDelete